Short intro about Keycloak
Keycloak is an open source Identity and Access Management application from Red Hat.
Keycloak provides:
- Single Sign On (SSO)
- Federated Authentication
- OpenID Connect support
- SAML (Security Assertion Markup Language) support, communicating Identities between organizations.
- OAuth2 support
- Identity Brokering – integrates multiple Identity Providers with different Service Providers
- Social Login, login by social networks like Google, Github, Facebook, Twitter, etc.
- Admin Console
- Two-factor Authenticator:
- TOTP (Time-based One Time Password) when one time code generator app on phone it is valid for some time and then generating a new value
- HOTP (HMAC-based One Time Password, event based token ) when the user unhides the one-time-password, the counter will be increased.
- Possibility to change Login Flow – It is possible to change login flow from keycloak admin console
Single Sign On (SSO)
It is an authentication method that enables users to login to several applications with the help of one set of credentials.
it makes it possible to login to several systems just by one set of credentials. For example Google, by login to google user is already logged in Gmail, Google calendar, YouTube, etc. . Any user is logged in to a Google product and automatically is logged in to another Google product.
Advantage of Single sign on:
- Platform independent – SSO is independent of platforms. Can be used on windows, Linux, MAC, Android, IOS
- Increase security by eliminating the need for several authentication for each application. Fewer credentiatial mean a lower chance of phishing, and lower social engineering.
- Better user experience – Users does not need to type password in several applications
- Better administration – By eliminating the need for several authentication, it eliminates the need for keeping and handling user information and credentials and reduces the number of databases to keep user’s info.
OAuth 2.0
OAuth 2.0 is a security standard which gives one application permission to access the user’s data in another application. Instead of giving username and password, it gives the app a key with specific permission to access the user’s data or do something on user behalf in another application. The key is an access token which is a JWT (Json Web Token).
OAuth 2.0 is designed for authorization, for granting access to data and features from one application to another. It is like giving an application a key which is not saying anything about who the user is.
Sample of access token:
{
«iss»: «https://my-domain.auth0.com/»,
«sub»: «auth0|123456»,
«aud»: [
«https://example.com/health-api»,
«https://my-domain.auth0.com/userinfo»
],
«azp»: «my_client_id»,
«exp»: 1311281970,
«iat»: 1311280970,
«scope»: «openid profile read:patients read:admin»
}
OpenID Connect
OpenID Connect (OIDC) is a protocol that sits on top of OAuth 2.0 . It adds functionality related to login and profile about who has logged in to OAuth 2.0 .
OIDC provides ID Token and Access Token and gives that to the client. ID tokens is a JWT token which in addition to permissions also provide basic information about who the user is
Sample of ID Token:
{
«iss»: «http://my-domain.auth0.com»,
«sub»: «auth0|123456»,
«aud»: «my_client_id»,
«exp»: 1311281970,
«iat»: 1311280970,
«name»: «Jane Doe»,
«given_name»: «Jane»,
«family_name»: «Doe»,
«gender»: «female»,
«birthdate»: «0000-10-31»,
«email»: «janedoe@example.com»,
«picture»: «http://example.com/janedoe/me.jpg»
}
Authentication flows:
- Authorization Code Flow: used by Web Apps executing on a server. This is also used by mobile apps, using the Proof Key for Code Exchange (PKCE) technique.
- Implicit Flow: used by JavaScript-centric apps (Single-Page Applications) executing on the user’s browser.
- Resource Owner Password Flow: used by highly-trusted apps.
- Client Credentials Flow: used for machine-to-machine communication.
Authorization Code flow with Keycloak
Run keycloak on Docker:
Keycloak can be run easily by this command :
docker run -p 8080:8080 -e KEYCLOAK_ADMIN=admin -e KEYCLOAK_ADMIN_PASSWORD=admin quay.io/keycloak/keycloak:17.0.0 start-dev
This command will download/start keycloak on docker locally. It will start keycloak on local port 8080 and also create an admin user with username admin and password admin. It will use an embedded H2 database. Also keycloak can use Postgress, MySQL, MariaDb, Oracle, MsSql.
After keycloak is up and running the admin console can be accessed by http://localhost:8080/admin
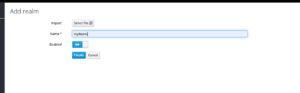
By default there is a single realm, master, and by login to the admin console user will login to master realm. The master realm is for administration purposes and you need to create a new realm, myRealm.
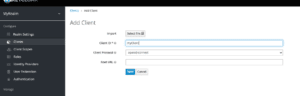
After switching to the newly created realm, myRealm, create a new client.
- Disable “Direct Access Grants Enabled”
- “Access Type” to “confidential”
- “Valid Redirect” to redirect back to after successful login
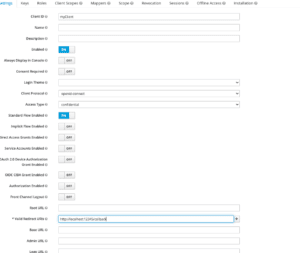
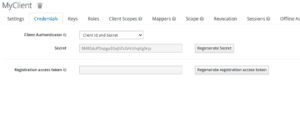
After saving, client_id and client_secret can be retrieved from “Credentials” tab
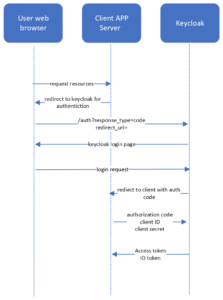
Authorization Code flow
- The flow starts with the authorization request, this redirects to the authorization server. Here the user logs in using his credentials and approves a consent page
- After successfully logging, keycloak sends back the authorization code to the specified redirect uri.
- Now the client application sends a token request to the authorization server to exchange the authorization code + client ID + client secret with an access token and ID token
URL to access authentication page on keycloak:
http://localhost:8080/realms/myRealm/protocol/openid
-connect/auth?response_type=code&client_id=myClient&redirect_uri=
http%3A%2F%2Flocalhost%3A12345%2Fcallback&scope=openid&state=something
This URL for keycloak will redirect you to the login page for keycloak. After successful login keycloak will redirect you back to the defined redirect_uri .
Now the client application by receiving the authorization code from the above call can make a request to keycloak with code + client ID + client secret to get access token and ID token.
Here is the curl command for getting access token and ID token:
curl -X POST http://localhost:8080/realms/myRealm/protocol/openid-connect/token \
–data grant_type=authorization_code \
–data ‘client_id=myClient’ \
–data client_secret=<PUT CLIENT SECRET HERE> \
–data code=<PUT CODE HERE> \
–data ‘redirect_uri=http%3A%2F%2Flocalhost%3A12345%2Fcallback’