[^1]: Microsoft Entra change announcements – September 2022 train
At Embriq, one of our largest Powershell modules is a Microsoft 365 Health Check service, that includes over 100 checks against your Microsoft tenant. It gathers information about security, users, licenses, devices, tenant settings etc. Which is a great way to get an overview of your tenants current status.
Recently, I’ve been migrating this service from using AzureAD and MSOnline to Microsoft Graph. This includes finding a replacement in Microsoft Graph for about 25 different cmdlets from these two modules. During this process I’ve gathered some useful tips for the journey that I want to share.
NOTE: This article was written with Powershell 7.3+ in mind and using the v1.25.0.0 of Microsoft Graph Powershell module.
Tip 1: Find Azure AD and MSOnline cmdlets in Microsoft Graph PowerShell
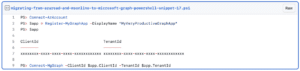
Microsoft has created a handy list of AzureAD and MSOnline cmdlets mapped to Microsoft Graph Powershell cmdlets. Most of the time you will find a match, but not always. One thing to note is that you will have more luck finding what you are looking for using the beta version for now.
E.g
As we can see, when using the v1.0 profile we dont get the PermissionGrantPolicyIdsAssignedToDefaultUserRole property at all. I came across several of these differences throughout the project.
My experience is that beta profile is much more complete and aligned with its counterpart in AzureAD and MSOnline cmdlets.
Links
- Find Azure AD and MSOnline cmdlets in Microsoft Graph PowerShell (v1)
- Find Azure AD and MSOnline cmdlets in Microsoft Graph PowerShell (beta)
Tip 2: Find Microsoft Graph object properties
The nice thing about Microsoft Graph Powershell, is that all cmdlet has defined an output and/or input object, which makes it easy to find the properties you are looking for without actually having to run the cmdlet. And it will give us some additional information for what the values of these properties can be.
To find the name of the output object for a cmdlet we can use the Get-Help Powershell built-in cmdlet.
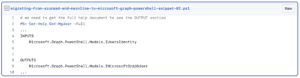
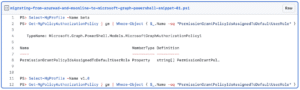
Here we can see what objects are expected. To get the properties for each of the objects we can instantiate them in our terminal and call the GetProperties() method.
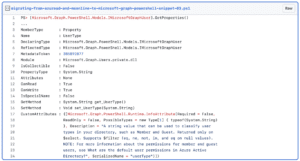
Here we can see what the name of the propery is (Name), what type it is (PropertyType) and some additional information inside the CustomAttributes property.
This helps tremendously when trying to find properties with the same information as in AzureAD or MSOnline cmdlets.
Tip 3: Understand how the Microsoft Graph Powershell SDK is structured
The Microsoft Graph Powershell SDK is huge and contains a lot of cmdlets. It can be difficult to know where to start. But, the cmdlets are actually constructed in a logical way. Once you understand the structure its easier to find the cmdlets you are looking for. It will also make it easier to translate other examples on the internet, into Powershell, that is not necessarily using the Powershell SDK, but REST or C# library.
Microsoft has a whole lot of documentation[^2] on how to navigate the Microsoft Graph Powershell SDK, so I’m not going into details, but here a quick overview.
[^2]: Navigating the Microsoft Graph PowerShell SDK
Command Verbs
For basic CRUD operations the powershell verb is determined by the HTTP method.
- HTTP GET => Get-*
- HTTP POST => New-*
- HTTP Patch => Update-*
- HTTP DELETE => Remove-*
Command prefix
All commands are prefixed with Mg.
Command nouns
The cmdlet nouns basically match the API paths (without id’s and slashes).
You get the point.
Find-MgGraphCommand
If you have the API path, but cant find the corresponding cmdlet, you could try the Find-MgGraphCommand which will take a Uri string, and present a list of related cmdlets.
Using Get-Command
Lastly, if you know some parts of the API you can try to search for a command using the Get-Command (or alias gcm) specifying the module to search within.
Tip 4: API Endpoints that is not yet supported by module
If you need to access some Microsoft Graph endpoint that is not yet supported by the module, you can always use Invoke-MgRestMethod.
It will use the token you authenticated with and do a raw request to the Microsoft Graph REST API.

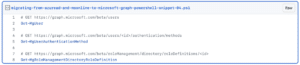
Tip 5: Create a script that will generate the app registration for you
Using the old modules didn’t require any setup in your tenant as long as the user you logged in with had the necessary permissions. When using Microsoft Graph this changes, and you need to create an App Registration and specify the permissions you need. As best practice, we want to use the least amount of permissions needed to do the job so therefor we need to carefully pick the permissions.
Setting up and managing these permissions can be cumbersome, especially if your script/module is used by multiple tenants. Creating this App Registration with correct permissions for each tenant manually is just not feasible in 2023. So, the solution, as I’ve seen some module writers already do, is to create a cmdlet or helper script that will create the app registration with necessary permissions for you. As with all automations you then only have to do it correct once, and run the script/cmdlet on as many tenants or for as many different applications you want.
Let’s explore how to do this!
Listing permissions
When creating a App Registration from Powershell, you must provide the API Permissions as permissions id’s. It can be difficuelt finding these permissions through Powershell, so the best thing to do is to create a template app registration that we can base our cmdlet on, or maybe you have an App Registration from before that you want to copy.
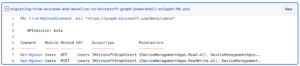
To list all ‘API Permissions’ for a App Registration we can do the following:

Unfortunately we only get the id’s, and what type they are.
- ‘Type: Scoped’ means that it’s a delegated permission
- ‘Type: Role’ means that it’s an application permission
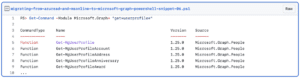
This next snippet is not necessary, but it will help us identify each of the permissions for Microsoft Graph.

If you just want to list all the permissions provided by Microsoft Graph you run the following:
NOTE
You can find the API Id and permissions id’s for other API’s by replacing the «Microsoft Graph» displayname with something else, like for example «Yammer» or «Azure DevOps».
(Get-AzADServicePrincipal -DisplayName "Yammer").AppId(Get-AzADServicePrincipal -DisplayName "Yammer").Oauth2PermissionScope(Get-AzADServicePrincipal -DisplayName "Yammer").AppRole
For the next section I’m going to use these delegated permissions:
- a154be20-db9c-4678-8ab7-66f6cc099a59 (User.Read.All)
- aec28ec7-4d02-4e8c-b864-50163aea77eb (UserAuthenticationMethod.Read.All)
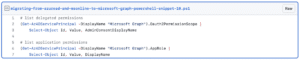
Creating the application
Now that we have the id’s for the permissions we need, we can start scripting out the creation of the app registration.
The first thing we want to do is to set up some variables to hold our information. The $apiId for Microsoft Graph is universal, so its the same for everyone. To assign permissions we need to tell the command which application (essentially which API) the permissions belongs to and then the permissions id itself. That’s why we need to store both.

Then we create the application itself.
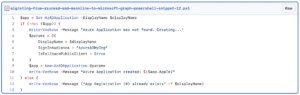
So to break down the code a little bit. We first check if the application already exists based on if it finds an application with the same name. If not we create a new Azure AD Application.
- SignInAudience: This tells the application which accounts can login through this application. Possible values are «AzureADMyOrg», «AzureADMultipleOrgs», «AzureADandPersonalMicrosoftAccount», «PersonalMicrosoftAccount»
- IsFallbackPublicClient: Will make this a public client, meaning that we can authenticate to it from the terminal.
After the application has been created we need to attach/create a service principal to it to be able to assign permissions.
NOTE
I find the concept of Enterprise Applications, App Registrations and Service Principals to be a little confusing and I’m not sure I fully understand it, but here’s a great explanation: Stack Overflow: What are the differences between Service Principal and App Registration?
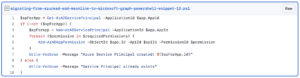
At last we can print out the necessary information to authenticate using this app registration.

Now we have a script that will create for us an app registration with the necessary permissions every time we run it.
NOTE
You will need to grant admin consent for the permissions in the Azure portal after the app registration has been created, as this is not supported by Microsoft Graph yet.
You also need to run the script being logged into Az Powershell module with a user that has permissions to manage app registrations.
Let’s add some checks
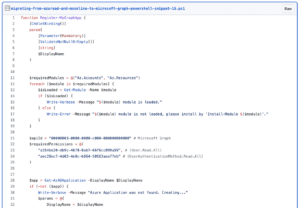
As an add-on to our script we should check if the user has installed the necessary Az modules to run this cmdlet.

- Az.Accounts is required for logging into Azure and to get the Az Context.
- Az.Resources is required for getting and creating Azure AD Application, Service Principal and assigning permissions
Putting it all together
Let’s gather all the pieces into a cmdlet.
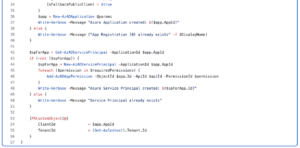
So now we only have to run two commands to install whats required of permissions.