This article will cover how to create an API gateway using Spring-cloud-gateway. Spring-cloud-gateway provides an API Gateway built on top of the Spring Ecosystem, including: Spring 6, Spring Boot 3 and Project Reactor. Spring Cloud Gateway aims to provide a simple, yet effective way to route to APIs and provide cross cutting concerns to them such as: security, monitoring/metrics, and resiliency[1].
The first steps will be a very simple gateway acting as a proxy between the endpoint user and the service, and will gradually become more complex as more functionality is created. All the code can be found in my spring-cloud-gateway GitHub repository and is organized in multiple branches all starting with stage-n corresponding to the tittle of the subchapter. Note that spring-cloud-gateway is based on Project Reactor so all code will have to process requests in a reactive way in stead of the simpler I/O blocking manner. This guide will assume that you know how to use Spring-webflux, and thus also Project Reactor.
[1] https://docs.spring.io/spring-cloud-gateway/docs/4.0.3/reference/html
Setup
We will use two services during this article, Foo and Bar. Each service has their own endpoints. For simplicity, no security is enabled between the services and content scanning against malicious content is not implemented. In a real world service, TLS should be enabled between all services, authentication should be considered and all outside input should be sanitized for malicious content that might compromise your service.
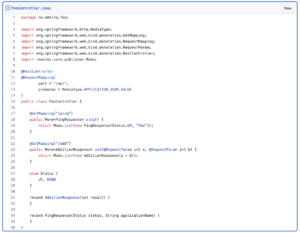
Foo endpoints
Foo has two endpoints defined in FooController. GET /api/ping returns the status of the application and the application name while GET /api/add takes two parameters, a and b, and returns the sum.
By default, the application will start up at port 8081.
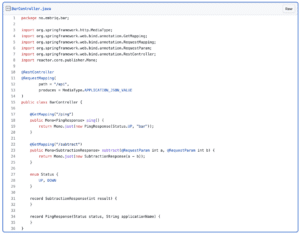
Bar endpoints
Bar has two endpoints defined in BarController. GET /api/ping returns the status of the application and the application name while GET /api/subtract takes two parameters, a and b, and returns the difference.
By default, the application will start up at port 8082.
Stage 1 — Only YAML configuration
If foo and bar are deployed as is, an endpoint user would have to use the correct hostname and port for each service and remember what service exposes what endpoints. In the first iteration of our API gateway, we will reduce this to a single hostname, port and set of endpoints. This does introduce a problem, namely that both foo and bar have an endpoint for GET /api/ping but as you will see, this has a simple solution.
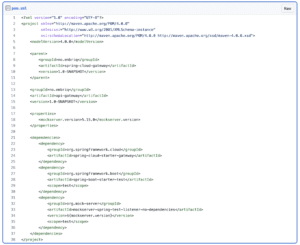
The simplest API gateway only needs a single dependency if you don’t count the test dependencies used for unit tests. Remember that pom.xml in api-gateway is simplified by externalizing all dependency versions to the parent-pom and to spring-*-dependencies artifacts.
The only Java code needed, is a class with a main method to start the Spring application:

The final step to create an API gateway in its simplest form is to add application.yaml to the resources directory:
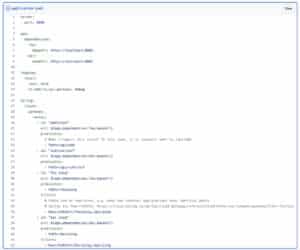
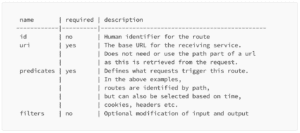
The spring-cloud-gateway configuration consist of routes. In the above example, a route consists of a single endpoint of two mandatory fields for each route, along with two optional fields. There is also support for general routes that accept all requests to e.g. /api/foo/* but that is not within the scope of this article. The routes consist of the following fields:
With the above files, we have a complete API gateway that will accept requests at port 8080 with the paths GET /api/add, GET /api/subtract, GET /foo/ping and GET /bar/ping.
The full code example can be found in the stage-1 branch
Stage 2 — Converting YAML to Java
The next step is to convert the existing YAML configuration of the API gateway to Java. I found this necessary as refactoring custom classes that are used in the route configuration becomes much easier when an IDE, e.g. IntelleJ, can help.
This is as simple as creating a new Spring bean like this:
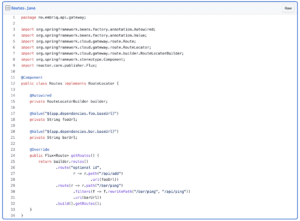
As you can see, many of the elements from the YAML configuration can be found in the Java code. The only difference is that the order of elements is important. Each route must start with the predicate and end with the uri. To avoid confusion, the same routes are removed from YAML. This also shows that you can simultaneously have both YAML and Java configuration of spring-cloud-gateway.
Another way to create routes in Java is to create an anonymous implementation of a RouteLocator bean in a class marked with @Configuration. This is possible because the interface only contains a single method. Do note that it is not marked with @FunctionalInterface so there is no author guarantee that it always will be a functional interface, though that is the example used by Spring in the spring-cloud-gateway reference documentation.
The full code example can be found in the stage-2 branch
Stage 3 — Creating a global logging filter
Now that basic routing is in place, we can set up a global filter. A global filter is code that will execute for every route even though it isn’t explicitly sett as a filter for the route. This can be done to ensure that I/O is logged in a required format, each request is authenticated, sanitizing input, schema validation and probably many other reasons.
As with routes, a global filter only needs to be introduced as a bean to be used.
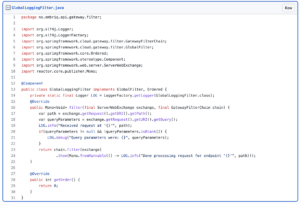
The class implements two interfaces, GlobalFilter and Ordered. Ordered is a non-mandatory, but recommended, indicator of the order when the filter should execute compared to other global filters. The GlobalFilter#filter method contains the actual filter logic. In this case, we extract the URI path and query parameters for logging before continuing the chain execution. After the chain is complete, the filter logs again.
Other changes in this stage are moving the remainder of the route definitions from YAML to Java.
The full code example can be found in the stage-3 branch
Stage 4 — Creating a filter for gateway processing
Stage 4 is the pre-runner for stage 5. Here we explore the possibility for no-op routes using regular filters, i.e. routes that are not proxied onward to other services. A regular filter in this context is a filter that must explicitly be set on a route to execute.
In the example, we will create a ping endpoint for the API gateway.
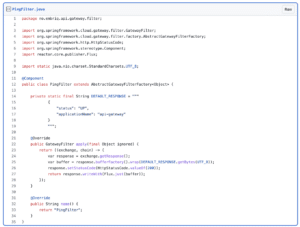
The PingFilter class shows how a no-op filter is created. It extends the filter factory class and implements two methods. name() returns the name of the filter. This value is what you would use if referencing the filter from YAML. apply(Object) is the factory method to instantiate the filter. Had the filter continued the execution of the chain (GatewayFilterChain) in the same manner as GlobalLoggingFilter then it would act as a regular filter that could be used in a regular route that proxies requests onward to other services. In the example, we do not continue the execution of the chain. Instead it creates and populates a DataBuffer that is written to the response and returned to the caller breaking the chain.
To apply the filter to a route, we add the following to our routes configuration. pingFilter is an autowired bean of the PingFilter class.

The full code example can be found in the stage-4 branch
Stage 5 — Composition
If you for some reason need to expose a single endpoint that calls two or more services and sends an aggregated result, rethink your solution. Composition is a sign of unfortunate service design and creates unnecessary complexity and network overhead as it requires explicit code to handle. If you still insist on creating a composition and want to create it in your API gateway instead of using another service, keep on reading.
Here we will create a composition of the add and subtract endpoints. We want to execute (a + b) - c using a single endpoint. The filter follows the same logic as the PingFilter, i.e. breaking the chain and returning a result.
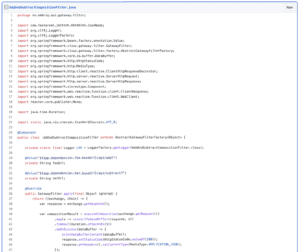
The apply(Object) and name() methods have already been explained in stage 4, so I will only explain the new concepts introduced here in the order of execution.
executeComposition(ServerHttpRequest) uses the received request as input and extracts query parameters a, b and c. This would be a good place to sanitize the input, making sure that the endpoint user does not have malicious intent. Then the code executes a GET request to the add service using a Spring WebClient. Should the request fail, then we let Spring handle it, but you could also create custom error handling. When the addition result is received, it is used as a part of the input when calling the subtraction service.
Next the String result from the composition is converted to a DataBuffer in convertToDataBuffer(ServerHttpResponse, String).
Upon success the DataBuffer is printed. This could be done in executeComposition(ServerHttpRequest) or convertToDataBuffer(ServerHttpResponse, String), but here I also show you how you could edit the content of a DataBuffer. Editing a DataBuffer is necessary if you want to create a custom solution to edit a response using the ServerHttpResponseDecorator. Alternativly you could use the pre-made ModifyResponseBodyGatewayFilterFactory to modify the response. A custom solution could be used in the case of wanting to peek at the outgoing body without modifying it, e.g. assure implementation details aren’t leaked when errors occur or executing schema validation on the outgoing body.
The filter is used by adding this to our routes. addAndSubtractCompositionFilter is an autowired bean.

The full code example can be found in the stage-5 branch
Stage 5 — Alternative
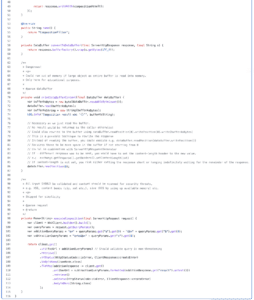
An alternative and probably more correct way to solve composition, though undocumented in the Spring Cloud Gateway reference documentation, is to create a RouterFunction. This article has not covered router functions as other more important (in my opinion) functionality is simpler to show using a filter.
A router function could look something like this:

Summary
As shown, creating an API gateway is not hard and doesn’t have to be complex. It should be a mandatory single point of contact for every service, hiding implementation details and ensuring that no internal details are leaked to the outside world.
As a final reminder, all code examples can be found in my GitHub repository and is organized in branches corresponding to the sub-chapter stage number.